
Why is it important to manage Final Cut Pro storage?
Obviously, the importance of managing Final Cut storage will be greater or less depending on the size of your Mac’s disk, therefore, it is always advisable, if you are going to dedicate your Mac to work on video editing tasks, at least start with of the 512 GB and thus be able to start editing more or less calm that you will not run out of disk space.
In case you have a Mac with a more limited storage space, you have to pay special attention to all that we are going to tell you in this post, since it will surely make your workflow much easier and you can not worry about something else when it comes to get to work editing audiovisual content.
Record in 4K, do you really need it?
Another way to avoid storage problems is, in the recording process, to select the appropriate resolution with which the camera will capture all the images. Obviously, as long as you can record at maximum resolution, it is advisable to do so, as you will have much more information and the quality of the document will be much higher. However, this is also going to have consequences on storage, since recording in 4K will take up a lot of space on the disc and later in Final Cut. Therefore, we invite you to reflect if you really need to always record at 4K, if not, you can lower the resolution and in this way you will also prevent your Mac’s storage from filling up when you start to edit said content.
Beware of the FPS.
Resolution is not the only thing that affects a video file occupying more or less disk space. The FPS you record at will also make the storage space you need both to store that content and to edit it later. Therefore, another tip to save storage space when editing is to choose the FPS at which you are going to record each shot. Obviously if you want to offer content in slow motion, you will have to configure your camera to record with enough FPS to later perform said slow motion, but if what you are recording is a conversation or yourself speaking, perhaps you can lower that parameter and record at less FPS, which will result in the size of that clip being smaller.

That your editing program does not fill your Mac
The objective of this post is to help you so that your editing program, in this case Final Cut Pro, does not end up taking up all the storage on your Mac and you practically have to dedicate your Apple computer to video editing because there is no space for anything more. Fortunately, Final Cut has a series of settings and settings that make it easier for the files you work with to not take up as much space on the computer’s own disk. Here are a series of actions you can take to prevent your Mac from filling up with files from Final Cut. Obviously, these actions can be carried out all, or none, or only some, everything will depend on your personal needs and preferences.
Where are the files you work with?
For all users who work in video editing, the use of a good capacity hard disk is essential, in addition, if this disk is an SSD, much better, because the data transfer speed will increase and you will save time each time you put it on. to edit, but you can also save storage space on your Apple computer.
Did you know that you can make the files you are editing always stay on your hard drive and Final Cut “grabs” them directly from there? By default, whenever you import content into one of your Final Cut libraries, what happens is that content is duplicated and saved on your computer, resulting in the same files on both your Mac and your hard drive. . Our advice is that, if you have a computer with limited storage, activate the option provided by Apple’s video editor to keep the files in their original location. To do this, the steps you have to follow are the following.
- Open Final Cut Pro.
- Click Final Cut Pro and then Preferences.
- Go to the Import tab.
- Under Files, select the “Leave files in place” option.
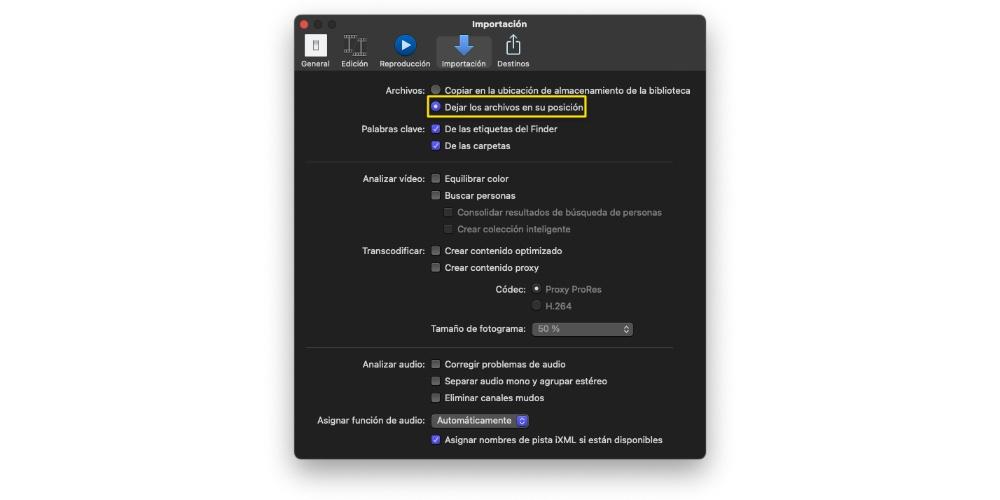
This will prevent your computer’s hard drive from filling up with all the files you want to work with and they will only remain on your hard drive, which will be the location from which Final Cut Pro will take all the files. Obviously, if you select this option, whenever you want to work on your audiovisual projects, you will have to have the hard drive where these files are located connected to your computer. This can be awkward at times, but it will definitely save you a ton of storage space on your Mac.
Define storage locations as you like
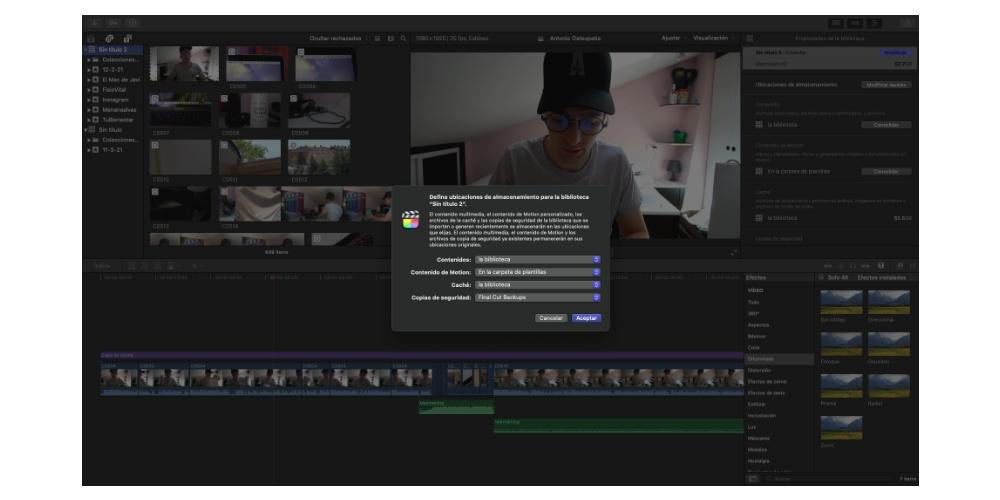
Another option that Final Cut Pro has so that users can manage the storage that it does on the Mac is the selection of storage locations. In this way, each user can choose where they want the content, Motion content, Cache and backup copies to be stored. To do this, you just have to follow the following steps.
- Select a library.
- In the library properties menu, click modify settings.
- Modify the location of the contents, the Motion contents, the Cache and the backup copies to your liking.
- Click OK.
Beware of generated library files
The files you work with are not the only thing that Final Cut Pro stores or can store on your Mac, rendering files, optimized content, and proxy content also occupy an important space as you progress through editing. your project. However, again, Final Cut Pro gives you the ability to free yourself from it whenever you want. To do this, you just have to follow the following steps.
- Select the library or events from which you want to remove such content.
- Click on File and select the option “Delete generated files from the library …”
- Select what you want to delete.
- Click OK.
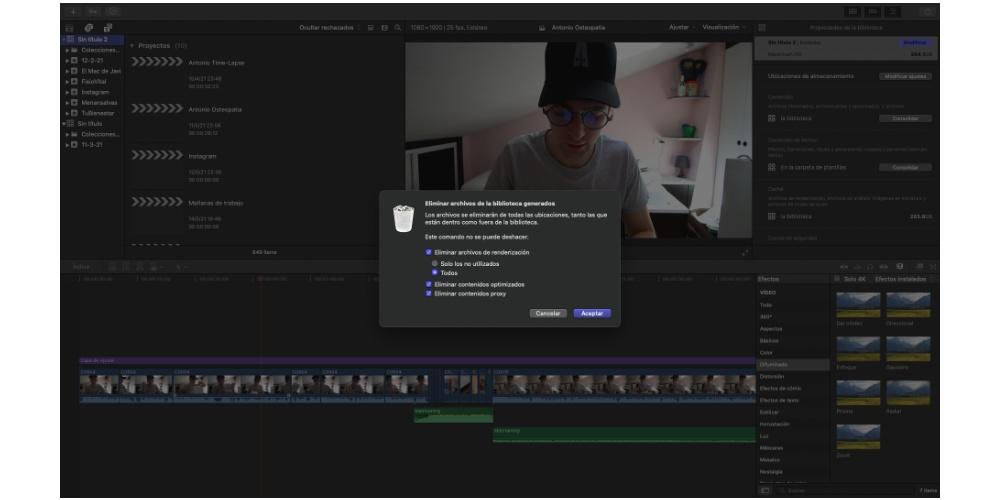
With these simple steps you can free up a ton of storage space. This type of file is what Final Cut generates as you edit an audiovisual document, our recommendation is that you do this either at the end of the day when you finish working or whenever you finish editing a project.
You may be wondering what happens if after deleting these files I want to work with the same project or library again? Nothing happens, Final Cut Pro will automatically re-generate all these files without you noticing, so that you do not have to worry about the loss of any information or file.
Check your events
If you are used to working on different projects at the same time, you probably have numerous events generated. In this case, it is very important to do a small review periodically to see if the content that exists in these events is being used or not, and consequently, to be able to eliminate it from the library to free up storage space.

Sometimes users start importing content forgetting to delete them when they have finished working with them and have fully exported the project. For this reason, it is especially important to carry out these reviews on a regular basis, especially if you store all your files on your computer and not on a hard drive. In addition, that will help you to have a much more exhaustive control of what you are doing.


/cloudfront-us-east-1.images.arcpublishing.com/eluniverso/ESZCYCVTMHULRF4XLKFETXEN2U.jpg "The phrase about the origins of Argentina, Brazilians and Mexicans is critical of President Alberto Fernandez. International | News")

